Tag: android games

  • The Room Walkthrough: Unlocking the Toughest Safes and Boxes

    The Room Walkthrough: Unlocking the Toughest Safes and Boxes

    Few mobile puzzle games reward patience quite like The Room. Every ornate box, hidden compartment, and rusted safe hides a mechanism that rewards close observation over quick guessing, and that is exactly why so many players get stuck staring at the same brass lock for twenty minutes straight. This game have 4.82 stars, 1M+ downloads. 

    This is not a level-by-level answer key, since The Room and its sequels reshuffle puzzle details across chapters and platforms often enough that specific numbered solutions stop being reliable fast. Instead, this The Room walkthrough breaks down the actual observation habits and mechanical patterns behind unlocking the game’s toughest safes and boxes, so you can crack new puzzles confidently instead of waiting on someone else’s exact answer.

    Why The Room’s Puzzles Feel So Different From Other Games

    The Room is built around tactile, physical logic rather than abstract riddles. Every lock, dial, and hidden switch behaves the way a real mechanical object would, which means the solution is almost always hiding somewhere on the object itself rather than in a separate hint or clue screen.

    This design choice is exactly why rushing tends to backfire. Players who tap around impatiently miss small details, like a faint engraving or a slightly misaligned panel, that the game expects you to notice through careful observation rather than trial and error.

    Master the Eyepiece Tool Early

    The eyepiece is one of the most important tools in The Room, and players who underuse it consistently struggle more than they need to on complex safes.

    Use It on Every New Object, Not Just Obvious Ones

    The eyepiece reveals hidden symbols, ultraviolet markings, and mechanisms invisible under normal viewing. Get in the habit of checking every new object with the eyepiece immediately, even ones that seem fully solved already, since some puzzles require switching between normal and eyepiece view mid-solution.

    Watch for Subtle Visual Differences

    Hidden compartments in The Room often show themselves through extremely subtle visual cues, like a slightly different texture or a barely visible seam. Rotating the object slowly while examining it through the eyepiece frequently reveals details that a quick glance misses entirely.

    Core Techniques for Cracking Safes and Locks

    Once you understand the game’s underlying logic, these techniques consistently help when approaching a new safe or locked box:

    1. Examine the object from every possible angle before attempting to interact with it. The Room rewards physical exploration, and rotating an object often reveals a mechanism hidden from the default viewing angle.
    2. Look for engraved symbols, numbers, or patterns elsewhere in the same room. Combination codes and dial sequences are frequently hidden in nearby furniture, paintings, or documents rather than on the safe itself.
    3. Test small movements before assuming a piece is purely decorative. Knobs, panels, and ornamental details often slide, twist, or press in ways that are not visually obvious until touched.
    4. Combine inventory items experimentally when stuck. Many locks require a specific tool or key found elsewhere, and combining unlikely item pairs occasionally reveals a new usable object.
    5. Revisit previously solved areas after finding a new tool. Some mechanisms only become interactive after acquiring an item from a completely different part of the room.

    Reading Environmental Clues Effectively

    The Room hides most of its puzzle logic directly within the environment rather than through separate hint text, which means learning to read the room itself is a core skill.

    Pay Attention to Lighting and Shadow

    Certain puzzle elements only become visible under specific lighting conditions, sometimes requiring the eyepiece and sometimes requiring you to physically adjust a light source within the scene. If a puzzle seems to be missing information, check whether adjusting nearby lighting reveals something new.

    Cross-Reference Symbols Across the Room

    Numeric and symbolic codes in The Room are almost never placed directly next to the lock they open. A recurring visual motif, like a specific animal or shape, often appears in multiple places throughout a room, and matching those repeated symbols is frequently the key to solving multi-step combination puzzles.

    Common Mistakes That Slow Down Progress

    Even patient, careful players lose time on tough safes because of a few repeated habits. Watch out for these:

    • Rushing through rooms without using the eyepiece consistently. Skipping this step means missing hidden mechanisms that are not visible under normal view.
    • Assuming decorative objects are purely visual. Many objects that look like set dressing are actually interactive and hide part of the solution.
    • Forgetting to revisit earlier puzzles after finding new tools. Some locks cannot be solved until an item discovered later in the room is brought back to them.
    • Overlooking symbol repetition across the environment. Combination codes are frequently scattered rather than presented in one obvious location.

    Cutting down on these habits alone tends to noticeably speed up how quickly you crack the game’s toughest safes and boxes.

    Building a Systematic Approach for New Puzzles

    Rather than memorizing specific solutions that may vary between chapters and versions, use this repeatable process whenever you encounter an unfamiliar safe or box:

    • Examine the object fully from all angles before touching anything
    • Switch to the eyepiece view and recheck the same object for hidden details
    • Scan the surrounding room for symbols, numbers, or patterns that might relate to the lock
    • Test small, subtle interactions on anything that could conceivably move or open
    • Revisit the puzzle later if you gain a new tool or item elsewhere in the room

    This approach solves the overwhelming majority of The Room’s puzzles without needing an outside answer key, and it holds up across the entire series regardless of which chapter or installment you are playing.

    Long-Term Habits for Getting Better at The Room

    Players who consistently work through The Room’s toughest content efficiently tend to share a few habits beyond individual puzzle strategy:

    • Treating every object in a scene as potentially interactive until proven otherwise
    • Using the eyepiece as a default first step rather than a last resort
    • Keeping track of unused inventory items, since they usually indicate an unsolved puzzle elsewhere
    • Staying patient on puzzles that resist an obvious solution rather than rushing through randomly

    None of these habits require outside help or a fixed answer list. They come down to careful observation and a willingness to examine every detail the game presents.

    FAQ: Solving The Room’s Toughest Puzzles

    Why does the eyepiece matter so much in The Room?

    The eyepiece reveals hidden symbols, mechanisms, and ultraviolet markings that are completely invisible under normal viewing, and a large portion of the game’s puzzles cannot be solved without using it.

    Are combination codes always found near the safe they open?

    Not usually. Codes and symbols are frequently hidden elsewhere in the same room, often disguised as decorative details, so checking the full environment before assuming you are missing information is important.

    What should I do if I have examined everything and I am still stuck?

    Revisit previously solved sections of the room, since some mechanisms only become interactive after acquiring a tool or item discovered later. Unused inventory items are often a strong hint that a puzzle elsewhere is still incomplete.

    Is there a single walkthrough that works across every version of The Room?

    Not reliably, since puzzle details shift between chapters and platform versions. Understanding the game’s underlying observation-based logic tends to be far more useful long-term than memorizing specific numbered solutions.

  • Mini Metro Efficiency Guide: Managing Huge City Networks

    Mini Metro Efficiency Guide: Managing Huge City Networks

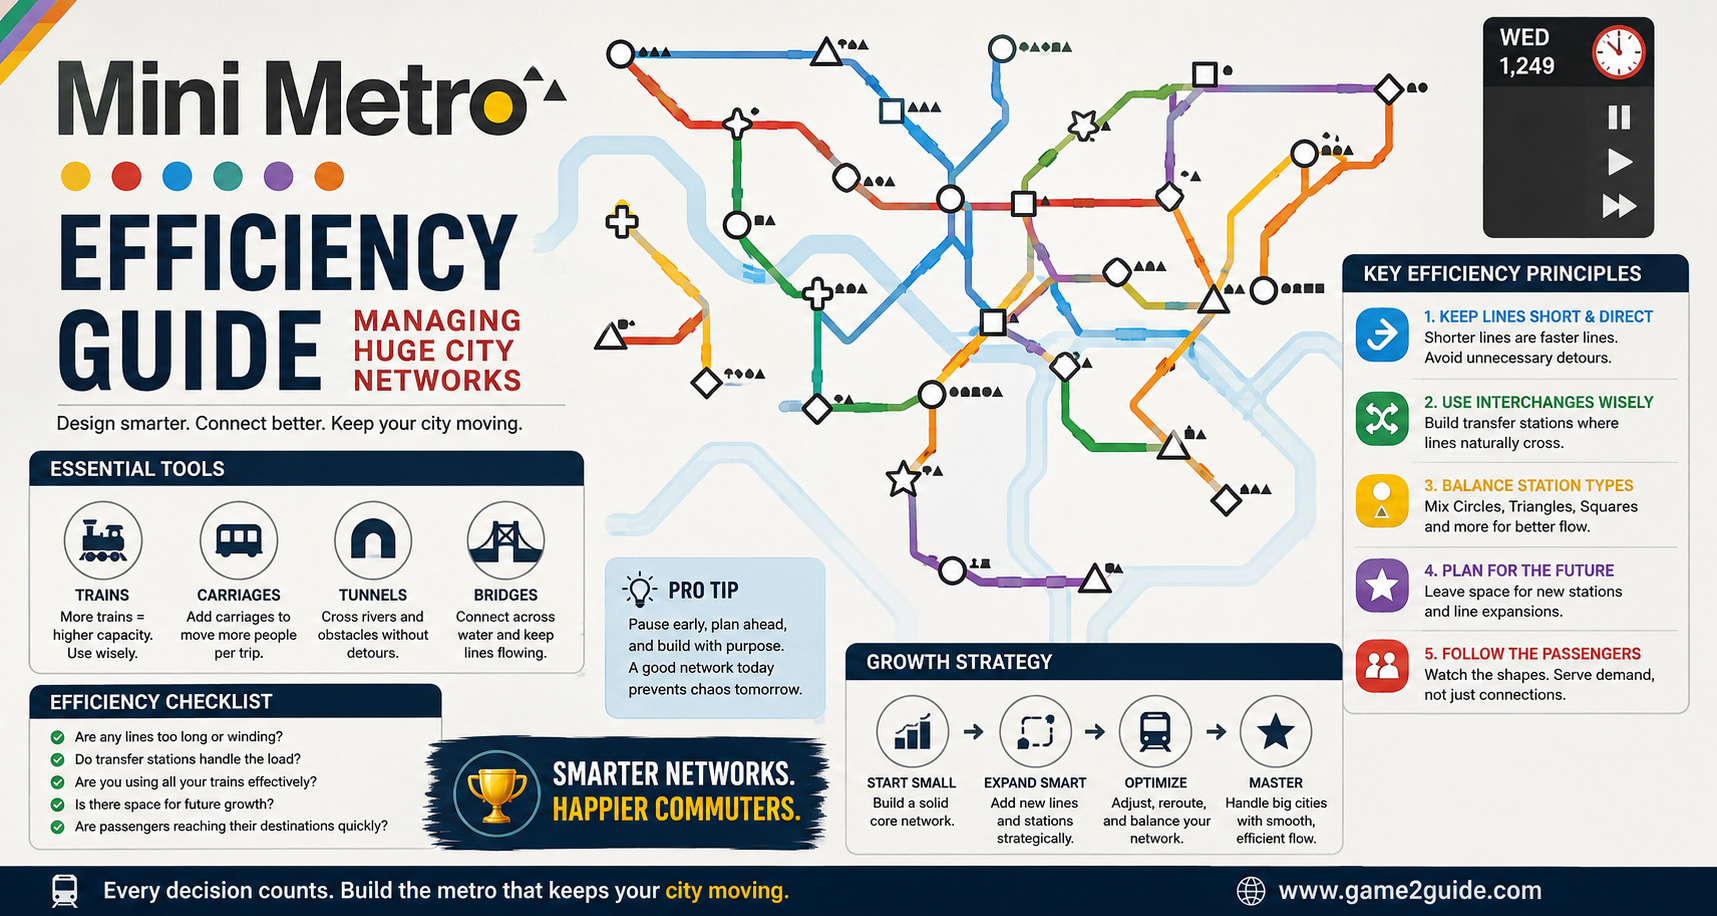
    The first twenty minutes of a Mini Metro run feel calm and manageable, right up until a fourth or fifth line gets added and the whole network starts collapsing under passenger overflow. What worked fine for a small city grid completely falls apart once stations multiply and transfer points get overloaded, and that shift catches a lot of players off guard. This game have 4.65 stars, 1M+ downloads. 

    This Mini Metro efficiency guide breaks down the planning habits, line management techniques, and resource decisions that keep sprawling networks running smoothly instead of buckling the moment your city grows past its early, easy stage.

    Why Small Networks Feel Easy and Big Ones Do Not

    Early in a Mini Metro session, a couple of straightforward lines can handle passenger flow without much thought. The real difficulty shows up once stations multiply across a wider map and lines start crossing over each other constantly.

    The core issue is rarely a lack of resources. It is usually a network design that worked fine at a small scale but was never built with growth in mind. A line that made perfect sense connecting four stations becomes a serious bottleneck once six more stations get added along the same stretch of city.

    Efficient large networks are planned with future growth already in mind, not redesigned reactively every time a new station appears.

    Planning Line Layouts Before Problems Appear

    The single biggest factor separating smooth, high-scoring runs from chaotic collapses is how deliberately lines get planned rather than extended.

    Group Stations by Geographic Clusters

    Rather than stretching a single line across the entire map, group nearby stations into clusters served by shorter, more efficient lines. This reduces the distance trains travel per loop and keeps individual lines from becoming overloaded highways that every passenger relies on.

    Reserve Straight Segments for High-Traffic Corridors

    Straight line segments move trains faster than segments with sharp turns. Identify which corridors are likely to carry the heaviest passenger volume, usually between densely packed station clusters, and prioritize keeping those specific segments as straight as possible.

    Managing Transfer Stations Without Creating Bottlenecks

    Transfer stations, where multiple lines intersect, are where most large Mini Metro networks start to break down. Passengers pile up waiting for connecting trains, and a single overloaded transfer point can slow down an otherwise well-designed network significantly.

    Here are practical ways to keep transfer points functioning smoothly:

    1. Avoid routing more than two or three lines through the same single station whenever possible, since each additional line increases congestion risk at that point
    2. Use interchange upgrades as soon as they become available at stations showing consistent passenger buildup, since they meaningfully increase capacity
    3. Spread transfer responsibility across multiple stations rather than relying on one central hub for the entire network, which reduces the impact if any single station becomes overloaded
    4. Monitor passenger shape icons at transfer stations closely, since a buildup of a specific shape usually signals a line combination that is not serving that connection efficiently

    Resource Allocation for Growing Networks

    Trains, carriages, and bridges are limited resources in Mini Metro, and how you allocate them matters just as much as line layout itself.

    Prioritize Carriages on High-Volume Lines

    Adding an extra carriage to your busiest line usually improves overall network efficiency more than adding an entirely new line with limited resources. A single well-supported line handling heavy traffic smoothly beats two thin, under-resourced lines competing for the same limited trains.

    Save Bridges for Water Crossings That Unlock Major Shortcuts

    Bridges are expensive resources, so use them specifically where they meaningfully shorten a route rather than wherever a river happens to be in the way. A bridge that saves a train several stations worth of travel time delivers a much bigger efficiency return than one used for a minor shortcut.

    Reading Passenger Patterns to Stay Ahead of Growth

    Efficient large networks are managed proactively, not reactively. Watching passenger behavior gives you early warning signs before a station actually becomes overwhelmed.

    • Watch for stations with steadily increasing passenger icons over several game weeks, since this signals a growing demand that current lines are not meeting
    • Pay attention to which passenger shapes consistently pile up at specific stations, since this often points to a missing or inefficient direct connection
    • Track which lines carry the most passengers overall and prioritize resource upgrades toward them first
    • Anticipate new station types appearing on the map edges and plan line extensions before they become urgent

    Common Mistakes That Cause Networks to Collapse

    Even experienced Mini Metro players lose otherwise strong runs because of a handful of repeated habits. Watch out for these:

    • Extending existing lines indefinitely instead of adding new ones. A single line stretched too far becomes slow and prone to overcrowding, even with extra carriages added.
    • Ignoring early signs of station overcrowding. Waiting until a station is visibly overwhelmed to respond usually means the damage has already started spreading to nearby stations.
    • Overusing a single transfer hub for the entire network. This creates a fragile single point of failure that collapses the whole system if it becomes overloaded.
    • Underinvesting in carriages while chasing new lines. More lines without adequate carriage support often creates more problems than it solves.

    Cutting down on these mistakes alone tends to noticeably extend how long a network stays efficient before collapsing.

    Long-Term Habits for Managing Huge City Networks

    Players who consistently handle sprawling Mini Metro networks well tend to share a few habits that go beyond individual line decisions:

    • Reviewing the entire network layout periodically rather than only reacting to the newest station
    • Balancing resource investment between new lines and upgrades to existing ones
    • Watching passenger shape trends closely to anticipate demand before it becomes a bottleneck
    • Being willing to redesign a line completely rather than patching it repeatedly with minor adjustments

    None of these habits require restarting a run constantly. They come down to treating network design as an ongoing process rather than a one-time setup.

    FAQ: Managing Large Mini Metro Networks

    What is the most common reason large Mini Metro networks collapse?

    Overloaded transfer stations are usually the main culprit. When too many lines route through a single hub, congestion at that point can slow down the entire network rather than just one line.

    Should I prioritize new lines or upgrading existing ones as my city grows?

    Both matter, but adding carriages to your busiest existing lines often delivers more efficiency than launching a new, thinly resourced line. Balance new lines with adequate support for the ones you already have.

    How many lines should pass through a single transfer station?

    Keeping transfer stations to two or three lines whenever possible helps prevent congestion. Spreading transfer responsibility across multiple stations reduces the risk of one hub becoming a bottleneck.

    When should I use a bridge instead of routing around water?

    Save bridges specifically for crossings that create major shortcuts and noticeably reduce travel time. Using them for minor detours wastes a resource that could deliver a bigger efficiency gain elsewhere.

  • Best Starter Cars in Need for Speed No Limits

    Best Starter Cars in Need for Speed No Limits

    Picking the wrong car early in Need for Speed No Limits can set you back weeks of grinding you did not need to do. This guide walks through the best starter cars in Need for Speed No Limits right now, why they matter more than people think, and how to avoid the rookie mistakes that stall progress before you even hit the first big Chapter wall. This game have 4.40 stars, 100M+ downloads. 

    Need for Speed No Limits sits comfortably in the arcade racing category, built around fast progression, tuning, and a card-based upgrade system that rewards smart early decisions. New players often assume any car will do for the first few chapters. It will not. The car you commit to in week one shapes how smoothly everything after it goes, from Special Events to Underground races.

    Why Your First Car Choice Actually Matters

    Every car in No Limits runs on a tier system, and upgrading a low-tier car past a certain point simply is not possible. Push a Tier 1 car too far and you will hit a wall where fusion parts stop mattering and the car caps out completely.

    Think of it like training for a race in the wrong shoes. You can still run, technically, but you are working against yourself the entire time instead of with the right gear. Choosing a starter car that scales well saves you from rebuilding your garage from scratch later.

    What Makes a Car “Starter Friendly”

    A good early car in Need for Speed No Limits usually shares a few traits:

    • Low fusion part requirements for early upgrades
    • Availability through free events rather than gold-only purchases
    • Decent Tier 2 or Tier 3 ceiling, not a hard Tier 1 cap
    • Balanced stats across acceleration, top speed, and handling
    • Frequent appearances in Blackridge or early Special Events, so parts are easy to farm

    Keeping these in mind narrows the field fast, instead of chasing whichever car looks flashiest in the showroom.

    Top Starter Car Picks Right Now

    Chevrolet Camaro

    The Camaro remains one of the most reliable early picks in the game. It is easy to obtain through standard progression, upgrades smoothly without demanding rare fusion parts, and holds its own in early Underground races. For players just getting a feel for the tuning system, this is about as forgiving as it gets.

    Ford Mustang GT

    The Mustang GT strikes a nice balance between raw speed and handling, which matters more than people expect in the tighter early tracks. It also tends to show up often in beginner-friendly events, meaning you will not be stuck waiting for a rare drop just to progress its upgrades.

    Volkswagen Golf GTI

    Do not underestimate this one. The Golf GTI is quick to fully upgrade, cheap on fusion parts, and handles corners better than its stats sheet suggests. It is a strong pick if your playstyle leans toward precision over brute horsepower.

    Nissan 370Z

    The 370Z sits comfortably as a mid-tier bridge car. It performs well past the point where most starter vehicles begin to fade, which makes it a smart choice if you want one car to carry you slightly longer before switching to a Tier 3 focus.

    Free-to-Earn Cars Deserve Priority

    One detail newer players often overlook: cars you can earn for free through events should generally take priority over ones bought outright, even when the purchased option looks shinier. Free cars still perform well within their tier, and saving your gold for fusion parts or garage slots stretches your resources far further.

    This is not about being cheap. It is about sequencing your spending so nothing goes to waste later. A related area worth studying alongside starter car choice is fusion part farming, since the two systems are tightly connected — the best car in the world does you no good if you cannot afford to upgrade it.

    Avoid These Common Starter Mistakes

    A handful of early habits quietly slow down progression more than anything else:

    1. Spreading upgrades across too many cars instead of committing to one or two
    2. Ignoring handling stats in favor of top speed alone
    3. Skipping daily events, which are often the fastest source of fusion parts early on
    4. Buying a flashy car before checking its tier ceiling
    5. Forgetting to check Special Event requirements before locking in an upgrade path

    Fixing even two or three of these habits early on noticeably changes how fast you move through the first several chapters.

    Handling Beats Horsepower Early On

    New players almost always chase top speed first, assuming a faster car wins races outright. In the tighter early tracks of Need for Speed No Limits, cornering and control matter just as much, sometimes more. A car with slightly lower top speed but sharper handling will often out-place a raw speed demon that keeps clipping walls.

    This is one of the quieter Need for Speed No Limits tips that experienced players rarely spell out clearly for beginners, mostly because it only becomes obvious after a few frustrating losses.

    Building Toward Your Second Car

    Once your starter car reaches its practical ceiling, the transition to a second, higher-tier vehicle should feel planned rather than rushed. Keep an eye on upcoming Special Events and note which car unlocks the best rewards for your current garage. Jumping into a new car without a plan often repeats the same mistakes from square one.

    Final Thoughts

    There is no single perfect starter car in Need for Speed No Limits, but there is a clear pattern among the ones that work well: low fusion costs, decent tier ceilings, and frequent availability through free events. Pick one of these cars, commit to it fully instead of splitting resources, and prioritize handling over raw speed in the early chapters. Do that consistently and the first few weeks of progression will feel far less like a grind and far more like actual racing.

    Frequently Asked Questions

    What is the best free starter car in Need for Speed No Limits?

    The Chevrolet Camaro is widely considered one of the strongest free early options, thanks to low fusion part demands and steady performance through the first several chapters.

    Should I upgrade one car fully or spread parts across several?

    Committing fusion parts to one or two cars almost always outperforms spreading resources thin. A fully upgraded starter car will beat a half-upgraded premium one in most early races.

    Does handling matter more than top speed for starter cars?

    In early tracks, yes. Tighter corners punish poor handling more than they reward extra top speed, so a balanced car often outperforms a faster but harder to control one.

    When should I move on from my starter car?

    Once a car hits its tier ceiling and upgrades stop making a noticeable difference, it is time to start planning a transition to a Tier 2 or Tier 3 vehicle rather than continuing to invest in a maxed-out car.

  • Angry Birds 2 Tactics: Choosing the Right Bird for the Job

    Angry Birds 2 Tactics: Choosing the Right Bird for the Job

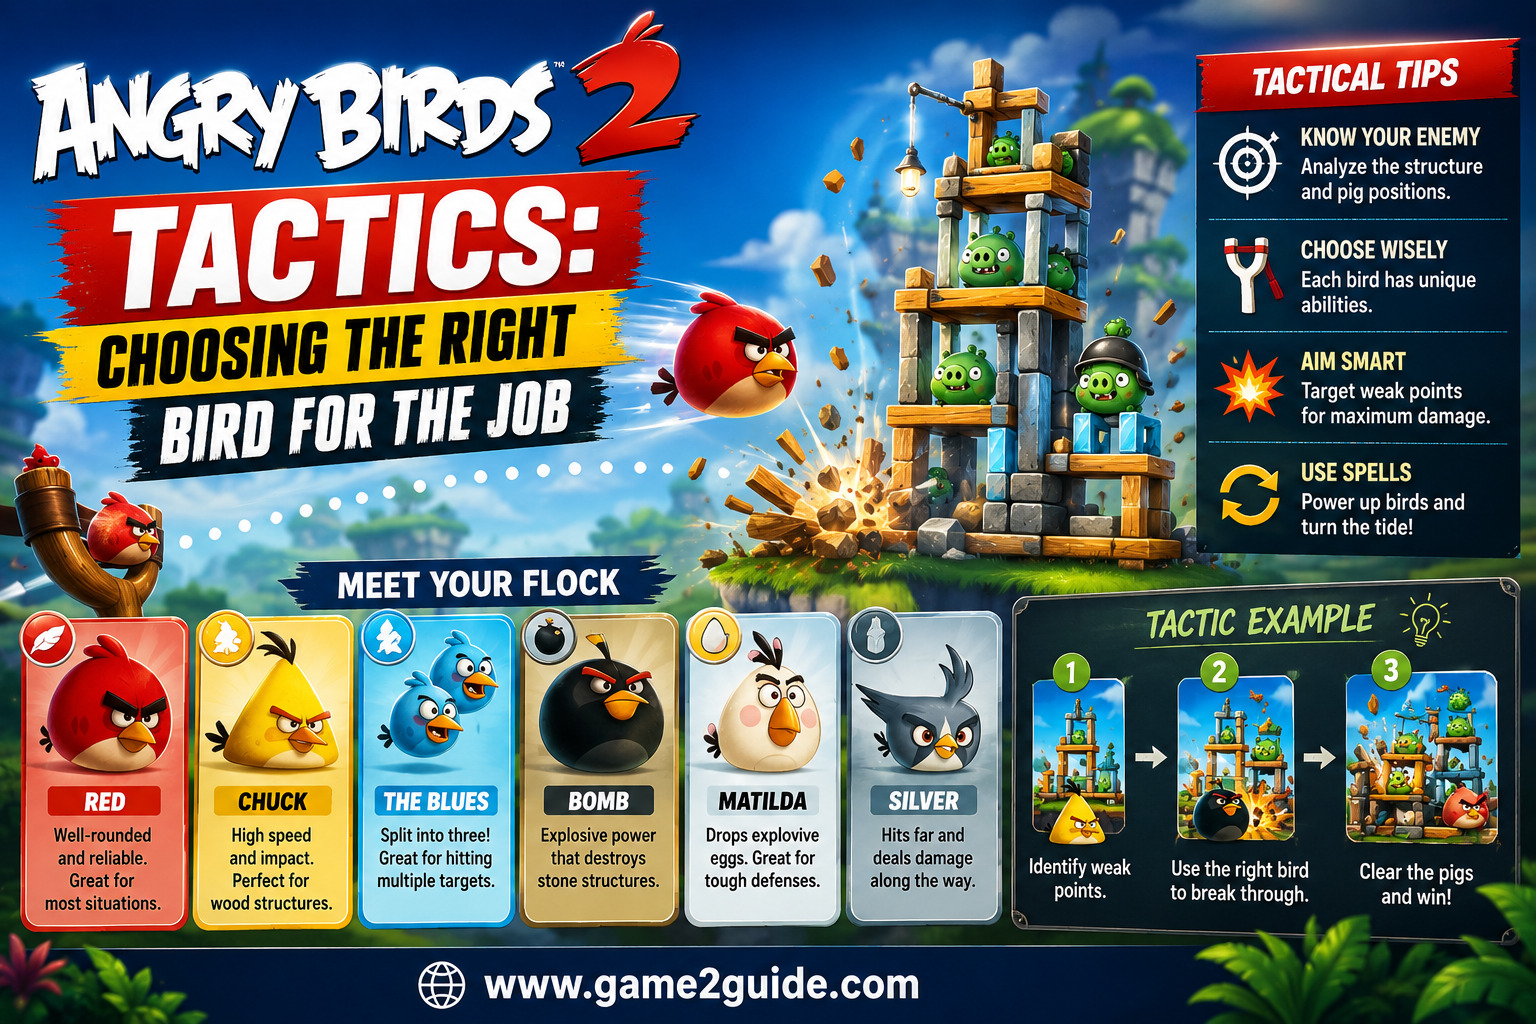
    Launching a random bird at a stack of pigs and hoping for the best works fine for the first few levels of Angry Birds 2. Past that, sloppy bird choices burn through your limited lineup fast, leaving you stuck on the exact structure a different bird could have flattened in one shot. Knowing which bird actually fits a given situation is one of the biggest skill gaps between casual players and consistent three-star finishers. This game have 4.10 stars, 100M+ downloads. 

    This guide covers real Angry Birds 2 tactics for choosing the right bird for the job, breaking down each bird’s strengths, the structure types they counter best, and how to sequence your limited lineup for maximum damage per level.

    Why Bird Selection Matters More Than Aim Alone

    A lot of players assume Angry Birds 2 comes down purely to trajectory and timing, but bird choice has just as much impact on your final score. Each bird in the roster has a distinct ability suited to specific structure types, and using the wrong bird against a poorly matched target wastes potential damage that a better-suited bird would have delivered easily.

    Since your lineup is limited per level, every wasted shot with a mismatched bird effectively costs you the ability to clear a later structure efficiently. Thinking about bird order strategically, rather than launching whichever bird happens to be next, consistently improves both your clear speed and star rating.

    Matching Bird Abilities to Structure Types

    Each bird’s special ability shines against certain materials and layouts far more than others, and recognizing these matchups is the core skill behind smart tactical play.

    Red Bird for Direct Impact and Simple Structures

    Red’s straightforward, no-frills impact works best against simple stacked structures or exposed pigs without much protective material around them. Save Red for situations where a direct, powerful hit alone gets the job done without needing a special ability.

    Chuck for Wood and Fast-Moving Targets

    Chuck’s speed boost ability tears through wood structures particularly well, and his quick trajectory makes him effective against pigs positioned in tighter, harder-to-reach spots. Use Chuck when wood is the dominant material blocking your path to pigs.

    Bomb for Stone and Clustered Groups

    Bomb’s explosive ability is specifically strong against stone structures and tightly clustered pig groups, since the blast radius damages multiple targets simultaneously. Save Bomb for situations with several pigs grouped closely together rather than using him on isolated, spread-out targets.

    Matilda for Precision Drops on Layered Structures

    Matilda’s egg-drop ability works especially well on layered or tiered structures where a direct horizontal hit would miss lower sections entirely. Her arc allows you to drop damage straight down onto structures that a flatter trajectory bird would sail right past.

    Silver for Looping Attacks on Spread-Out Layouts

    Silver’s looping flip ability makes her uniquely effective against spread-out pig placements or structures with pigs positioned behind protective barriers, since her attack pattern can curve around obstacles other birds simply cannot reach.

    Building a Smart Bird Order for Each Level

    Beyond matching individual birds to individual structures, sequencing your entire lineup thoughtfully makes a noticeable difference across a full level attempt.

    1. Scout the full level layout before your first launch. Understanding which structure types dominate the level lets you plan which birds to prioritize early versus save for later sections.
    2. Save your best-matched bird for the toughest structure, not the first one you see. Using a strong counter bird immediately on an easy early structure often leaves you underpowered against the level’s real challenge later.
    3. Use weaker matchup birds on structures they can still handle reasonably well. Not every shot needs a perfect counter. Save true mismatches for structures where the wrong bird genuinely cannot make progress.
    4. Account for the destruction card slot when planning bird order. A well-timed destruction card paired with the right bird often clears a structure that neither could handle efficiently alone.

    Using Spell Cards to Complement Bird Choice

    Spell cards add another layer of tactical decision-making on top of bird selection, and using them at the right moment amplifies whichever bird you have chosen for that shot.

    • Save powerful offensive cards for levels with unusually tough boss structures, rather than using them on standard early obstacles
    • Pair a card that boosts a specific bird’s ability with that bird’s natural strength, such as amplifying Bomb’s blast radius against a stone-heavy structure
    • Hold defensive or utility cards for levels where pig placement is unusually tricky, since these often help more than raw offensive power in those situations

    Common Mistakes That Waste Bird Potential

    Even experienced players lose stars unnecessarily because of a handful of repeated habits. Watch out for these:

    • Launching birds in a fixed order regardless of structure type. This ignores the actual matchup advantages each bird offers against specific materials.
    • Using a strong counter bird too early in a level. Saving your best-matched bird for the toughest section usually produces a better overall score than using it on an easy early structure.
    • Ignoring material type entirely. Wood, stone, and ice all respond differently to specific bird abilities, and treating every structure the same wastes a significant amount of potential damage.
    • Forgetting to account for spell cards when planning bird order. A well-paired card and bird combination can clear a structure that either alone would struggle against.

    Cutting down on these mistakes alone tends to noticeably improve your clear rate and star scores across tougher levels.

    Long-Term Habits for Better Tactical Play

    Players who consistently perform well in Angry Birds 2 tend to share a few habits beyond individual level tactics:

    • Reviewing each bird’s ability regularly, since matchup instincts fade if you rely on the same one or two birds constantly
    • Scouting the full level layout before committing to a bird order rather than reacting shot by shot
    • Saving strong offensive spell cards specifically for boss levels or unusually tough structures
    • Practicing precision with birds you use less often, like Silver or Matilda, so their unique abilities become reliable rather than risky

    None of these habits require premium currency or rare pulls. They come down to understanding each bird’s strengths and applying that knowledge deliberately rather than launching birds on autopilot.

    FAQ: Angry Birds 2 Bird Selection Tactics

    Which bird is best for stone structures?

    Bomb tends to perform best against stone, since his explosive blast radius damages a wider area than a direct-impact bird would manage against dense stone material.

    Should I always save my strongest bird for later in a level?

    Generally, yes. Using a well-matched bird on the toughest structure rather than an early, easier one tends to produce a better overall score across the full level.

    How much do spell cards actually matter compared to bird choice?

    They matter significantly on tougher levels. Pairing the right card with a bird’s natural strength, such as boosting Bomb’s blast radius on a stone structure, can clear obstacles that either alone would struggle against.

    Is it worth practicing with birds I rarely use, like Silver or Matilda?

    Yes. Both have unique attack patterns that counter specific structure types other birds cannot handle well, and getting comfortable with their trajectories opens up more tactical options across different levels.

  • Asphalt 9 Drifting Guide: Maximize Your Nitro Bars Quickly

    Watching an opponent blast past you with three nitro bars stacked while you are stuck with barely half a bar is one of the most frustrating experiences in Asphalt 9: Legends. The gap usually is not about car stats. It comes down to drifting technique, and players who master it consistently pull ahead through nitro alone, regardless of what vehicle they are driving.This game have 4.5 stars, 50M+ downloads. 

    This Asphalt 9 drifting guide breaks down exactly how to build nitro efficiently through drifting, covering timing, drift angle control, and the specific habits that separate players who chain nitro boosts constantly from players who barely fill one bar per lap.

    Why Drifting Matters More Than Raw Speed

    A lot of new players assume winning races comes down to picking the fastest car and holding the gas trigger through straightaways. In practice, nitro management through drifting has a much bigger impact on final race times than raw top speed alone.

    Every drift you execute cleanly fills your nitro bar, and stacking multiple bars lets you chain boosts together for extended stretches of extra speed. A mid-tier car with a driver who drifts constantly and efficiently will frequently beat a higher-tier car driven by someone who barely touches the drift mechanic at all.

    Understanding the Core Drift Mechanic

    Before diving into advanced technique, it helps to be clear on how drifting actually fills your nitro bar in the first place.

    How Drift Duration Affects Nitro Gain

    The longer you hold a controlled drift through a turn, the more nitro you accumulate from that single maneuver. Short, rushed drifts barely register compared to a smooth, extended drift held through the full curve of a turn.

    The Difference Between Drift Angle and Drift Duration

    Drift angle affects how sharply your car turns during the maneuver, but duration is what actually fills the nitro bar most significantly. A wide, well-controlled drift held for the entire turn produces noticeably more nitro than a sharp, quick drift that ends almost as soon as it begins.

    Techniques for Maximizing Nitro Through Drifting

    Once the basic mechanic feels familiar, these specific techniques help squeeze significantly more nitro out of every turn:

    1. Initiate your drift slightly earlier than feels natural. Starting the drift a moment before the turn actually requires it gives you more total drift duration across the curve, which translates directly into more nitro gained.
    2. Hold the drift through the full length of the turn rather than cutting it short. Releasing early to straighten out sooner sacrifices nitro gain for a marginal speed benefit that rarely pays off.
    3. Chain drifts through S-curves without fully straightening between them. Connected drifts through consecutive turns build nitro much faster than treating each turn as a separate, isolated maneuver.
    4. Use manual drift controls if you are comfortable with them. TouchDrive handles drifting automatically, but manual control allows more precise timing that experienced players use to extract slightly more nitro per turn.
    5. Combine drift zones with existing nitro pickups on the track. Timing your drift so it overlaps with a nitro bottle pickup stacks both nitro sources together rather than collecting them at separate, less efficient moments.

    TouchDrive Versus Manual Control for Nitro Efficiency

    Asphalt 9 offers both TouchDrive, which handles steering automatically, and manual control, which gives the player direct steering input. Each has different implications for how efficiently you build nitro.

    TouchDrive Advantages for Consistent Drifting

    TouchDrive automatically initiates drifts through most turns, which makes it more forgiving for players still learning timing. It consistently produces reasonable nitro gain without requiring precise manual input, making it a solid default for players prioritizing consistency over maximum optimization.

    Manual Control Advantages for Advanced Players

    Manual control allows drift initiation timing, angle, and duration to be fine-tuned beyond what TouchDrive automatically provides. Experienced players who have practiced manual drifting extensively can typically extract more nitro per lap than TouchDrive manages on its own, though it requires significantly more practice to execute consistently well.

    Using Nitro Efficiently Once You Have It

    Building nitro quickly only helps if you use it effectively once it is available. Wasting a full nitro bar at the wrong moment undoes a lot of the drifting effort that filled it.

    • Save nitro for straightaways rather than triggering it mid-turn, since nitro boosts are far more effective when your car can maintain a straight trajectory at full speed
    • Chain multiple nitro bars together for extended boost windows rather than using a single bar the moment it fills, especially on longer straight sections
    • Use perfect nitro timing, activating right as a straightaway begins, to maximize the distance covered during the boost window
    • Watch for nitro-specific track sections that reward sustained boost use, since some tracks are designed with long straights specifically to reward well-timed nitro chains

    Common Mistakes That Waste Nitro Potential

    Even players comfortable with basic drifting lose significant nitro efficiency because of a handful of repeated habits. Watch out for these:

    • Cutting drifts short to straighten out early. This sacrifices nitro gain for a marginal handling benefit that rarely improves overall lap time.
    • Using nitro immediately upon filling instead of saving it for an ideal straightaway. Reactive nitro use often wastes boost potential on sections where it barely matters.
    • Relying entirely on TouchDrive without ever practicing manual drift timing. This caps your nitro efficiency below what more precise manual control could achieve.
    • Ignoring drift opportunities on wider, gentler curves. Some players only drift through sharp turns, missing out on nitro gain available from longer, gentler curves that still support an extended drift.

    Cutting down on these mistakes alone tends to noticeably improve how quickly you build and effectively use nitro across a full race.

    Practice Habits That Build Consistent Drift Timing

    Like most technique-based mobile racing mechanics, consistent nitro efficiency comes from deliberate practice rather than occasional lucky drifts. A few habits make a real difference over time:

    • Practice manual drifting on familiar tracks before relying on it in competitive multiplayer races
    • Focus specifically on holding drifts through the full turn length rather than cutting them short out of habit
    • Review replays of strong races to identify which turns produced the most nitro gain
    • Experiment with drift initiation timing slightly earlier than feels natural to find your car’s optimal drift window

    None of these habits require premium currency or car upgrades. They simply require repetition and attention to timing.

    FAQ: Maximizing Nitro Through Drifting in Asphalt 9

    Does drift angle or drift duration matter more for nitro gain?

    Drift duration generally matters more. A wide, sustained drift held through the full turn produces noticeably more nitro than a sharp, quick drift that ends almost immediately.

    Is TouchDrive good enough for competitive nitro management?

    TouchDrive provides consistent, reasonable nitro gain and works well for most players, but manual control allows more precise timing that experienced players use to extract additional nitro per lap.

    When is the best time to use a full nitro bar?

    Save nitro activation for straightaways rather than mid-turn, since your car can maintain full boosted speed more effectively on a straight trajectory than through a curve.

    Can I combine drifting with nitro pickups on the track?

    Yes. Timing your drift so it overlaps with a nitro bottle pickup stacks both sources together, which is more efficient than collecting them as separate, isolated moments.

  • Top Android Puzzle Games to Challenge Your Brain

    Top Android Puzzle Games to Challenge Your Brain

    Staring at your smartphone screen during a quiet evening or long transit ride often demands more than mindless scrolling through social media feeds. Playing top Android puzzle games provides an immediate spark of mental engagement that sharpens critical thinking skills while delivering immense satisfaction. This curated list highlights ten exceptional titles, ranging from spatial architecture mysteries to rule-breaking logic challenges, that every puzzle enthusiast should install right now.

    Why Touchscreen Devices are Perfect for Puzzle Mechanics

    Touchscreen displays on modern mobile devices have completely revolutionized how players interact with digital puzzles. Physical tactile actions, such as dragging a wooden slider, rotating a brass cog, or sliding a letter tile across a board, feel remarkably natural on a glass screen. You are not maneuvering a distant cursor with an awkward mouse or thumbstick; you are directly reaching out and touching the puzzle pieces with your fingers. This hands-on interaction creates an authentic sensory connection that mirrors solving a real wooden puzzle box on a coffee table.

    Because of this physical simplicity, mobile puzzle games appeal to players across every age group and skill level. Developers do not need to clutter the screen with virtual directional pads or complex button combos. Instead, a clean interface lets you focus entirely on spatial reasoning, pattern recognition, and logical deduction. Whether you have two minutes while waiting in a checkout line or two hours to relax before sleeping, selecting from the top Android puzzle games guarantees smooth and responsive problem solving.

    Furthermore, smartphones excel at running offline puzzle games for Android without draining hardware resources or requiring constant server pings. Unlike high-end action games that overheat your device and exhaust battery life within an hour, puzzle titles utilize lightweight rendering engines. This technical efficiency ensures that your phone remains cool while allowing you to enjoy hours of continuous play during extended travel or unexpected network outages. Discovering new mobile puzzle games has never been easier or more rewarding for casual players.

    The Ten Top Android Puzzle Games You Need to Download

    Navigating the vast library on the Google Play Store can feel overwhelming due to thousands of repetitive clones. To help you discover genuine masterpieces, we have selected ten standout top Android puzzle games that showcase brilliance in game design, visual presentation, and cerebral challenge.

    Spatial and Architectural Masterpieces

    1. Monument Valley 2

    Few titles capture the pure wonder of spatial manipulation like Monument Valley 2. Players guide a mother and her child through impossible architecture inspired by the mathematical artwork of M.C. Escher. By twisting perspective, lowering bridges, and rotating geometric structures, you create connected walking paths that should not exist in three-dimensional reality. It is a stunning visual journey that treats architecture as a fluid, living riddle.

    2. Mekorama

    For players who adore isometric dioramas, Mekorama offers an utterly charming mechanical playground. You control a clumsy little yellow robot navigating thirty-three intricate 3D building blocks. Rotating each floating stage reveals hidden staircases, sliding platforms, and electrical switches. The game includes a robust level editor, meaning that the community constantly shares thousands of custom user-created stages for endless playability.

    Immersive Mystery Boxes and Environmental Puzzles

    3. The Room: Old Sins

    Fireproof Games perfected the tactile mystery box subgenre, and The Room: Old Sins represents their finest technical achievement. Investigating a mysterious dollhouse in an abandoned attic reveals complex mechanical locks, secret compartments, and supernatural artifacts. Examining every surface with a special optical lens exposes hidden clues etched into brass fittings, making it one of the most atmospheric top Android puzzle games ever created.

    4. Gorogoa

    Gorogoa is a visual masterpiece constructed entirely of hand-drawn illustrations by developer Jason Roberts. Players interact with a two-by-two grid of illustrated panels, zooming into specific details, panning across landscapes, and stacking image frames on top of one another. Uncovering the hidden connections between seemingly unrelated scenes tells a silent, poetic story while delivering mind-bending spatial logic puzzles that feel like magic tricks.

    High-Concept Logic and Rule-Bending Challenges

    5. Baba Is You

    If you believe you are a logic genius, Baba Is You will gladly prove you wrong in the best possible way. In this game, the rules of each level exist as pushable word blocks on the screen itself. By rearranging words like “Baba Is You,” “Wall Is Stop,” or “Rock Is Push,” you literally rewrite the fundamental physics of the world. Changing the text block to “Wall Is You” allows you to control every brick wall simultaneously, flipping traditional game logic entirely on its head.

    6. Railbound

    Railbound combines adorable hand-drawn visuals with deeply satisfying track-laying logistics. Your goal is simple: connect passenger train cars to a locomotive in the correct numerical order. However, narrow pathways, shifting track switches, and limited track pieces quickly turn simple rail routes into tricky pathfinding riddles. With over two hundred custom-designed stages, it delivers a gentle learning curve that smoothly transitions into brain-melting complexity.

    Relaxing Strategy and Cozy Problem Solving

    7. Unpacking

    Unpacking proves that everyday activities can become deeply emotional puzzle experiences. The game follows a character through various life transitions, from decorating a childhood bedroom to arranging a first college apartment and shared adult home. Your task is to unpack cardboard boxes and place every item—books, kitchenware, clothes, and trinkets—into logical locations. It is a relaxing, zen-like experience that tells a rich story without a single line of dialogue.

    8. Mini Metro

    Urban planning turns into a compelling minimalist challenge in Mini Metro. As a transit designer, you draw subway lines between expanding city stations to keep passengers moving efficiently. As new river crossings, train cars, and interchanges become available, managing overcrowded platforms requires constant tactical adjustments. The clean aesthetic and dynamic audio soundscape make it one of the most replayable top Android puzzle games on the market.

    Fast-Paced Casual and Mind-Bending Brain Teasers

    9. Brain Test: Tricky Puzzles

    When you want lighthearted fun that actively subverts expectations, Brain Test: Tricky Puzzles delivers dozens of absurd riddles. Standard logic will not help you here; instead, you must shake your phone, drag text from the instruction header, or plug in your battery charger to solve levels. It stands out among mind games on Android because it constantly forces you to break the fourth wall of mobile software.

    10. Threes!

    Threes! is the original sliding-number puzzle that inspired countless imitations, yet the original remains undefeated in design purity. Sliding numbered tiles across a four-by-four grid to combine matching multiples of three requires careful forward planning. A single careless move can clog your board, forcing you to think three steps ahead like a master chess player.

    Detailed Comparison of the Top Android Puzzle Games

    Selecting the perfect game depends heavily on your preferred gameplay style, offline accessibility, and budget. The table below provides a quick side-by-side snapshot of these featured top Android puzzle games to help you decide which title to install first.

    Game TitlePrimary Gameplay GenreDifficulty LevelOffline SupportMonetization Model
    Monument Valley 2Spatial PerspectiveCasual / ModerateFull OfflinePremium
    MekoramaIsometric DioramaModerateFull OfflineFree / Optional Tip
    The Room: Old Sins3D Mechanical BoxHighFull OfflinePremium
    GorogoaStorybook Panel StackingHighFull OfflinePremium
    Baba Is YouRule-Manipulating LogicExtremely HighFull OfflinePremium
    RailboundTrack PathfindingModerate / HighFull OfflinePremium
    UnpackingCozy Zen PlacementCasual / RelaxingFull OfflinePremium
    Mini MetroTransit Network StrategyModerateFull OfflinePremium
    Brain Test: Tricky PuzzlesTrick Lateral RiddlesVariableFull OfflineFree with Ads
    Threes!Sliding Tile MathHigh MasteryFull OfflinePremium / Free Version

    All ten of these selections rank among the absolute top Android puzzle games because they respect player time and do not rely on aggressive paywalls or forced waiting timers.

    Core Characteristics That Make Mobile Puzzle Games Special

    What elevates a good puzzle game into a legendary one? Exceptional developers understand that solving a puzzle should feel like discovering a secret rather than taking an exam.

    Here are the key attributes that define the highest quality mobile puzzle games:

    • Elegantly Simple Controls: The best titles require only single-finger taps or basic swipes, ensuring that interface friction never distracts from problem solving.
    • Respectful Difficulty Curves: Great games introduce new mechanics gently through gameplay intuition rather than lengthy, dry tutorial text.
    • Tactile and Audio Feedback: Crisp mechanical clicks, soft paper swooshes, and subtle haptic vibrations make digital interactions feel physical and satisfying.
    • Zero Time Pressure Options: Many players seek out mind games on Android to decompress after a stressful workday, making relaxed, unhurried pacing a vital design feature.
    • Offline Independence: Premium design allows full access to all stages while on airplane mode, making them ideal travel companions.

    When a game combines these features, players experience a state of mental flow where focus becomes completely effortless. That sense of accomplishment is what elevates mobile puzzle games above simple time-killers when playing the top Android puzzle games available today.

    How to Choose the Best Offline Puzzle Games for Android

    Selecting the right title from this list depends on your current mood and how much time you can dedicate to a session. If you want a deep, narrative-driven experience that requires your complete concentration, premium titles like The Room: Old Sins or Gorogoa provide unmatched atmosphere. They behave like digital mystery rooms that you can carry in your pocket anywhere you travel.

    On the other hand, if you prefer quick gaming bursts while waiting for a bus or taking a work break, numerical or sliding challenges like Threes! or Mini Metro are superior choices. These titles allow you to pause instantly without losing track of complex story elements or environmental clues.

    Finally, consider whether you want a relaxing zen session or a tough mental workout. Games such as Unpacking provide gentle comfort without any penalty for mistakes, whereas Baba Is You will push your logical reasoning to its absolute limits. Whichever path you select, downloading these offline puzzle games for Android yields incredible value and guarantees high-quality entertainment anywhere you go.

    Frequently Asked Questions About Top Android Puzzle Games

    Are top Android puzzle games playable without an active internet connection?

    Yes, the vast majority of premium top Android puzzle games function completely offline once the initial app installation is complete. Offline accessibility is a major advantage of titles like Monument Valley 2, Railbound, and The Room: Old Sins, allowing you to play during flights or in locations without cellular coverage.

    What is the primary difference between free and premium puzzle titles on Android?

    Free-to-play puzzle games often rely on energy systems, microtransaction boosters, and frequent video advertisements that interrupt your gameplay flow. Conversely, premium top Android puzzle games require a single upfront purchase but deliver an uninterrupted, ad-free experience with no paywalls or forced waiting periods.

    How do mind games on Android help improve cognitive skills?

    Regularly engaging with mind games on Android stimulates spatial reasoning, working memory, and lateral problem solving. By challenging your brain to recognize complex visual patterns and deduce logical connections, these games keep your mind active and agile in an entertaining way.

    Which puzzle game is best for short five-minute play sessions?

    For brief gaming breaks, Threes! and Mini Metro are outstanding choices. Both games feature fast startup times, intuitive touch controls, and gameplay loops that allow you to start, pause, or resume a session in seconds without losing your place.